❋
By Kandor Co.
HOW TO USE YOUR KANDOR CO. SKIN CAMOUFLAGE METHOD
Step 1. Choose Your Base
Cleanse your skin and make sure it is hydrated and moisturised. Start with the base lighter than or closest to your natural skin tone. Scoop out a small amount with the spatula (a little goes a long way) - you can do this on the back of your hand as the warmth will really help blend the colours or alternatively use the mixing palette. Then add in a little of the medium or deep base gradually, until it is darkened enough to your preference. Once dark enough it is time to adjust! .
🤍 Light Base = Fair Skin
🤍🤎 Medium Base = Medium Skin
🤎 Deep Base = Tan to Deep skin
Don't worry if it isn't perfect. The Skin Camouflage Method is designed so you can customise every shade.
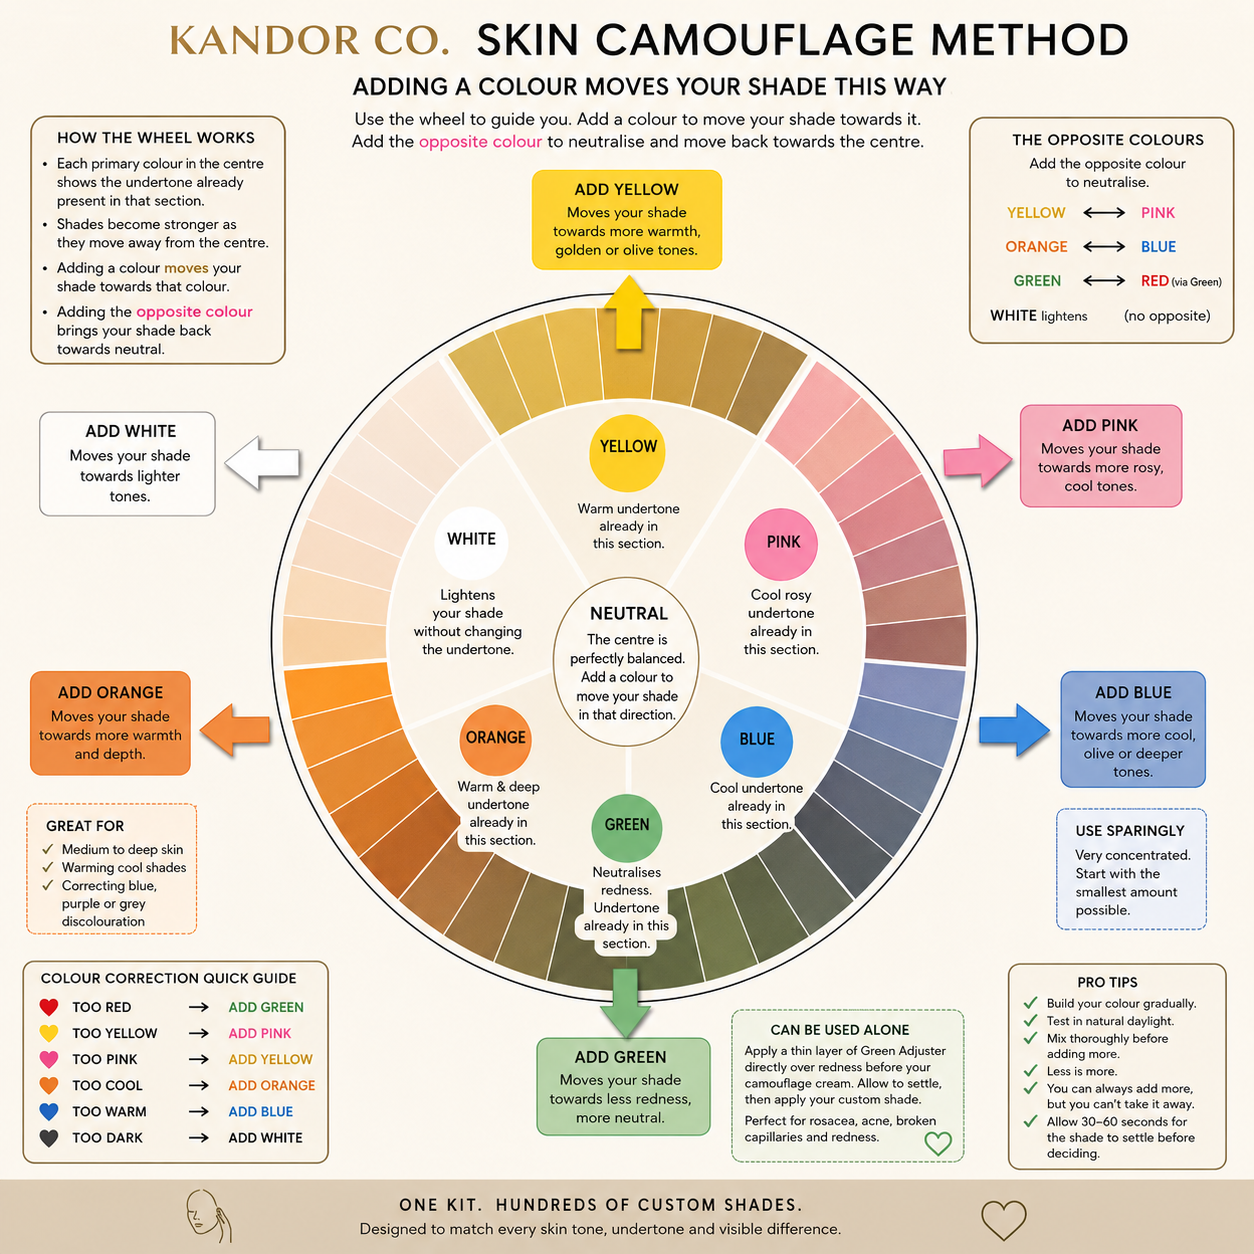
Step 2. Understanding Your Colour Wheel
Your colour wheel is your mixing guide. You will see a couple of the shade adjusters do the same thing but just a little differently, for example green and blue. You can play around and see what you prefer.
The primary colour shown in the centre of each section represents the undertone already present in that shade.
For example:
🟡 A shade sitting in the yellow section already contains yellow undertones.
If your mixture needs more warmth, simply add Yellow Adjuster and your shade will move further around the wheel towards the next yellow shade.
If it becomes too yellow, add the opposite colour (blue or pink*) to gently neutralise it and move your shade back towards a neutral tone.
Think of the wheel as a map.
Adding a colour moves your mixture towards that colour.
Adding the opposite colour brings your mixture back towards neutral.
Always adjust a little at a time.
Step 3. Adjust Your Shade
Only use a tiny amount of adjuster at a time.
Mix thoroughly before deciding whether to add more.
Small adjustments create the most natural results.
🤍 White
• Lightens your mixture.
Perfect for very fair skin tones or areas that need softening.
💛 Yellow
Adds warmth.
Use if your shade looks:
• Too pink
• Too cool
• Too grey
• Too dull
Moves your mixture towards a golden or olive undertone.
🩷 Pink
Adds rosy, cool tones.
Use if your shade looks:
• Too yellow
• Too warm
• Too olive
Moves your mixture towards a cooler complexion.
🧡 Orange
Adds warmth and depth.
Ideal for:
• Medium to deep skin tones
• Warming cool foundations
• Correcting blue, green, purple or grey discolouration
💙 Blue
Adds coolness.
Use to:
• Cool overly warm mixtures
• Create olive undertones
• Deepen shades without making them overly warm
A tiny amount goes a long way.
💚 Green
Neutralises redness / pinkness
Also neutralises shades that are too orange.
Add to help create a olive undertone.
Ideal for:
• Rosacea
• Acne
• Broken capillaries
• Red scars
• Flushed skin
Green can also be used on its own before your camouflage cream.
Apply an extremely thin layer directly over redness, allow it to settle, then apply your customised camouflage shade over the top. This creates a more natural finish and often requires less product.
Step 4. Colour Correction Quick Guide
If your mixture is too yellow/golden
➡️ Add Pink.
Pink contains red + a little white, so it reduces excessive yellow and shifts the mixture towards a more neutral or rosy undertone.
For example:
🟡 Too golden → add Pink
🫒 Too olive → add Pink
🟠 Too sallow → add Pink
But if your mixture is too warm because it's orange and not yellow
Adding Blue is often a better correction than Pink.
If your mixture looks too yellow
🩷 Pink neutralises yellow/golden undertones
💛 Yellow neutralises pink/red undertones
💙 Blue cools excessive warmth/orange
🧡 Orange adds warmth / Fake Tan look
💚 Green neutralises redness, pinkness and orangeness
⚫ Too Dark
→ Add White
Remember...
Adding a colour moves your mixture towards that colour on the wheel.
Adding the opposite colour neutralises it.
Step 5. Test Your Shade
Apply a small amount to your jawline or the area you're covering.
Allow it to settle for 30-60 seconds before making any further adjustments.
If it disappears into the skin...
✨ Congratulations, you've created your perfect match.
If not, simply make another tiny adjustment.
Pro Tips
✔ Build your colour gradually. You can always add more, but you can't take it away.
✔ Always test your shade in natural daylight.
✔ Mix thoroughly before adding another adjuster.
✔ Less is more. Most shades only need a tiny amount of adjuster.
✔ Green works brilliantly by itself to reduce redness before applying your camouflage.
✔ Orange can be used by itself under medium to deep skin tones to help neutralise blue or purple areas before camouflage.
✔ White is for more than just fair skin. It can soften any mixture that has become too deep.
✔ Blue is extremely concentrated. Start with the smallest amount possible.